Accurate pivot door measurement ensures smooth installation and long-term performance. Key steps include measuring rough opening width, height, and depth; accounting for frame clearance; and considering pivot placement. Standard allowances of ½″–1″ per side ensure proper swing. Factoring in material thickness, door weight, and hardware requirements prevents binding, dragging, or non-compliance with ADA standards.
Why Measuring Correctly Matters
A pivot door is not just a decorative feature; it’s a structural element that requires precise alignment. Incorrect measurements can cause:
- Binding or dragging against the floor.
- Gaps that compromise insulation and security.
- Misaligned pivots leading to premature hardware failure.
Proper measuring is the foundation for functionality, durability, and ADA compliance.
Tools You’ll Need
- Steel tape measure
- Spirit level
- Carpenter’s square
- Notepad or digital measuring app
Step-by-Step Guide to Measuring for a Pivot Door
1. Measure the Rough Opening
Start with the framed opening where the door will be installed.
| Dimension | How to Measure | Notes |
|---|---|---|
| Width | Measure from stud to stud at top, middle, and bottom. Use the smallest value. | Deduct 1″ for clearance and frame. |
| Height | Measure from floor to header at left and right sides. Use the smallest value. | Deduct ½″–¾″ for clearance. |
| Depth | Measure wall thickness including drywall or cladding. | Ensures frame fits flush. |
2. Account for Frame & Clearance
- Allow ½″–1″ clearance on each side for proper swing.
- For tall doors, leave at least ½″ floor clearance to avoid dragging.
- Ensure header framing is strong enough to bear the load.
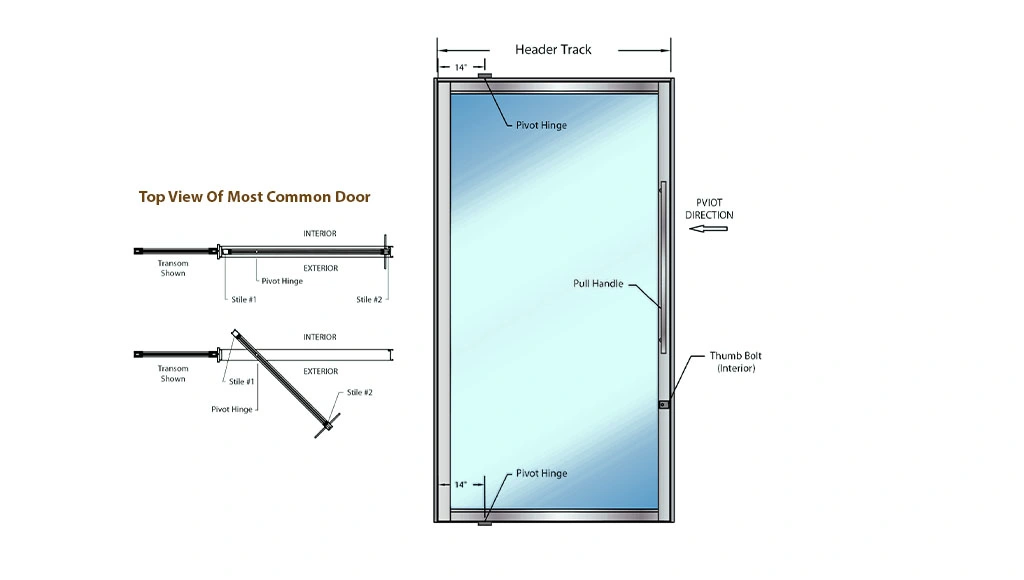
3. Consider Pivot Placement
Pivot doors swing differently from traditional hinged doors. Pivot placement influences space usage and weight distribution.
| Pivot Offset | Best Use Case | Result |
|---|---|---|
| 2″ – 4″ from edge | Residential entry doors | Maximizes clear opening width. |
| 6″ – 12″ from edge | Commercial or oversized doors | Adds dramatic effect and balances weight. |
| Center pivot | Large statement doors | Equal swing inside/outside, requires wide clearance. |
4. Factor in Thickness & Weight
- Minimum thickness: 1.75″ (interior), 2″–2.25″ (exterior).
- Calculate estimated door weight based on size and material.
- Choose pivot hardware rated 25% above actual door weight for safety.
5. Check ADA & Code Compliance
- Minimum clear width after installation: 32″.
- Maximum opening force: 5 lbs for interior pivot doors.
- Minimum clear height: 80″.
Common Mistakes to Avoid
- Measuring only once (always measure at least three points).
- Forgetting to deduct for clearance.
- Ignoring uneven floors or headers.
- Overlooking space required for full swing radius.
Quick Measurement Checklist
- Rough opening width, height, depth
- Frame clearance allowance
- Pivot offset location
- Door thickness and material weight
- ADA/code compliance
Conclusion
Measuring for a pivot door requires precision and planning. By following the correct steps—measuring rough openings, allowing clearance, considering pivot placement, and accounting for thickness and hardware—you’ll ensure a door that not only looks stunning but functions reliably for years.